If the Trust.Zone VPN Client stops working on your Windows and returns the error message "The Virtual Network Adapter being used ..." you may need to reinstall the TAP adapter.
Here is how you can reinstall the TAP adapter:
1) Exit the Trust.Zone VPN client in case it's running. To do so please click the Exit button then click OK to confirm exiting.
2) Open the Device manager (run devmgmt.msc).
3) Expand the Network adapters section, find and right click TAP-Windows Adapter V9 and select Uninstall. Please turn on Delete the driver software for this device checkbox when prompted.
4) Download the TAP adapter:
In case your operating system is Windows 10, Windows 11, Windows 8.1, Windows 8, Windows 7 or Windows Vista please download the following TAP-adapter version : tap-windows-9.24.2.601.exe
For Windows XP please download the following TAP-adapter version : tap-windows-9.0.0.9.exe
5) Run the downloaded TAP adapter exe file to install it.
6) Run Trust.Zone VPN Client and try to connect.
In order to prevent problems with cooperation between your antivirus/firewall/anti-malware software and Trust.Zone VPN Client we strongly recommend adding Trust.Zone VPN Client into exceptions/exclusions list in your antivirus/firewall/anti-malware software.
You can find how to add software into exceptions/exclusions list in manual reference of your antivirus/firewall/anti-malware software. Please, note that some antivirus software may include firewall inside, for example Norton Internet Security from Symantec.
You can add entire folder or files into exceptions list.
By default client folder path is C:\Program Files\Trust.Zone VPN Client\
Default files to add into antivirus/firewall/anti-malware exceptions/exclusions list are:
In case your operation system is 32-bit:
C:\Program Files\Trust.Zone VPN Client\trustzone.exe
C:\Program Files\Trust.Zone VPN Client\tzclient.exe
In case your operation system is 64-bit:
C:\Program Files\Trust.Zone VPN Client\trustzone_x64.exe
C:\Program Files\Trust.Zone VPN Client\tzclient_x64.exe
Is my PC running the 32-bit or 64-bit version of Windows?
In order to prevent your antivirus/firewall/anti-malware software from blocking Trust.Zone VPN Client installation setup you also need to add Trust.Zone VPN Client Setup file to exceptions list before you run client installation. Default file name of Trust.Zone VPN Client Setup file is Trust.Zone_Windows_Client_Setup.exe
Please make sure your Tunnelblick is installed properly to Applications folder.
Make sure nothing is blocking Tunnelblick, for example antivirus or firewall. Add Tunnelblick to exceptions in firewall and antivirus.
Try to uninstall Tunnelblick with Uninstaller app and install latest stable version. You can get Uninstaller and latest stable version of Tunnelblick here: https://tunnelblick.net/downloads.html
This problem can appear when antivirus/firewal/anti-malware software blocks VPN client activity.
Please, try to connect to Trust.Zone VPN with your antivirus/firewall/anti-malware disabled/turned off. If you are able to connect this way, please, add Trust.Zone VPN Client into exceptions/exclusions list in your antivirus/firewall/anti-malware software.
You can read more info how to add Trust.Zone VPN Client into exceptions list in the following FAQ item: https://trust.zone/faq#exceptions
In case you're using AVG antivirus, please, read the following article: How to get rid of DHCP Request Failed error when AVG Antivirus is running on your PC
If you still have problem after trying steps above please read following troubleshoot: I have problem with connecting to Trust.Zone VPN after installing/upgrading Trust.Zone VPN Client software
Yes, Trust.Zone VPN supports Mac OS X and macOS operating systems.
Here you can find how to Setup VPN Connection on Mac OS X / macOS:
How to setup OpenVPN connection with using of Tunnelblick software.
How to setup L2TP/IPSec connection with using of native Mac OS X / macOS client.
In both cases please select desired VPN zone from list (VPN zone closer to your location is recommended due to better speed and more stable connection) and follow instructions.
When you open any website directly, there is easy way to detect your real IP address and, consequently, your location. So, your Internet Service Provider (ISP) and site owners know where you are from and who you are. But, as opposed to this, when you open website while being connected to Trust.Zone there is no way to detect your real IP, but only IP of one of our servers. This way nobody knows who you are and what your location is. Your ISP can't track your moves. You are able to browse the Internet securely and anonymously.
All data between you and Trust.Zone servers are encrypted, so nobody can track your traffic and online activity between you and our servers, even your ISP.
Trust.Zone is service which gives you access to our VPN network (VPN is Virtual Private Network or `Network over Internet`). All transferred data are encrypted, so there is no way to define what kind of data is transferring. Transferred data packets are useless for `listeners` because packets are encrypted.
If you are under Windows OS, the best way to connect to Trust.Zone is to use our client app. You can download it from Trust.Zone Download page for free!
If you are under Linux, Mac OSX, iOS, Android, any other OS, or if you want to setup Trust.Zone connection in your Router, we did a special Wizard Page for you in order to make configuration process easy and straight forward.
In case you are not able to log in to your Trust.Zone account you can reset your password by using the following page: https://trust.zone/tr/password.
After submitting your current Trust.Zone email address (which you're using to log in to Trust.Zone website) message with reset link will be sent to this email. After clicking on reset link in the message you will be able to set your new password.
Web Proxy and VPN connect through an anonymous IP address. VPN encrypts your entire internet connection meanwhile proxy encrypts a single protocol. VPN encrypts and routs all of your traffic through the VPN server, including all software and applications. The full list of differences between Proxy and VPN available here.
VPN (Sanal Özel Ağ), cihazınız ile internet arasında güvenli, şifreli bir tünel oluşturur. Halka açık ağlarda bile çevrimiçi etkinlikleriniz gizli ve korunmuş kalır. VPN, gerçek IP adresinizi gizler ve bağlandığınız VPN sunucusunun IP’siyle değiştirir — böylece web siteleri, reklam verenler ve hatta İnternet Servis Sağlayıcınız sizi izleyemez.
Trust.Zone ile çevrimiçi verileriniz tamamen gizli ve İnternet Servis Sağlayıcınızdan görünmez.
No, you still need your existing internet connection (DSL, cable, 3G or etc.) to be able to use the Trust.Zone VPN.
Yes, with Trust.Zone VPN service you are able to use it from as many different devices and computers as you want. You must not exceed 3 (or 5) simultaneous connections depending on your subscription plan. In other words, only 3 (or 5) devices can be connected to Trust.Zone VPN service at the same time.
Evet, Trust.Zone her ay 1.000 kullanıcıya 3 günlük ücretsiz deneme sunuyor — kredi kartı gerektirmez.
Deneme süresince birden fazla sunucu lokasyonuna, sınırsız veriye ve sınırsız bant genişliği erişimi elde edersiniz.
Her ay 1.000 kullanıcı ile sınırlıdır — Ücretsiz dene
Sınır yok. Trust.Zone tüm ücretli planlarda sınırsız veri aktarımı ve sınırsız bant genişliği sunar — kısıtlamasız yayın izleyin, gezin ve indirin.
Trust.Zone VPN service doesn't block or throttle any kind of internet traffic. All kinds of internet traffic are allowed.
You don't need a powerful PC to install a Trust.Zone VPN. Trust.Zone VPN tool has minimal space and memory requirements. A normal PC with an existing internet connection (DSL, cable, 3G or etc.) is quite enough. Trust.Zone VPN supports all major OS platforms and devices - Windows, iOS, Android, Linux, Windows Mobile, Mac and other.
To install Trust.Zone VPN client you can require administrator privileges.
Yes, you may notice slowing down of your internet connection because all your data additionally flows through one more server (Trust.Zone VPN Server) and is encrypting which also take some time. You may also notice slowing down in case VPN server you trying to connect is too far away from your current location or it is overloaded. In this case we recommend you trying several VPN zones around you starting from ones which are closer to you.
The speed with your ISP provides will also affect the speed of a VPN connection. In case of normal internet connection (Cable, DSL, 3G) the VPN speed won't be much affected. Dial-up or unstable 3G connections can cause VPN connectivity issues. However, if you are in Canada and connect to a VPN server in China you may notice significant reduction in your internet speed. In most cases, the closer you are to the VPN server, the faster your internet connection will be.
In case your connection speed getting slower after you get connected to Trust.Zone VPN, please check what zone you're currently using.
We recommend you trying several VPN zones around you starting from ones which are closer to you. E.g. if you're in Australia, please connect to au.trust.zone. In case you're in west of United States, please connect to us-west.trust.zone and so on.
Each zone may contain several servers in it. Sometimes same zone can give you different connection speeds. This happens because you're getting connected to different servers from same zone. You can check what exact server you're connecting by opening our Connection Check Page. In case you want to connect to different server in same zone, you need to reconnect to same zone again.
Evet. VPN kullanmak dünya genelinde, ABD, Kanada, Birleşik Krallık, Avustralya ve tüm Avrupa dahil olmak üzere, neredeyse her ülkede tamamen yasaldır. Milyonlarca birey ve işletme gizliliklerini korumak ve verilerini güvence altına almak için VPN’leri günlük olarak kullanıyor.
Hayır. Trust.Zone’a bağlandığınızda ISS’niz yalnızca bir VPN’e bağlı olduğunuzu görür, yaptığınız etkinlikleri değil.
Tüm bağlantınız şifrelenir ve gizlidir, bu da şunları sağlar:
Trust.Zone ile ISS’niz karanlıkta kalır — olması gerektiği gibi.
Trust.Zone VPN doesn't track your online activity except amount of data transferred by user. We do not track what exact data is transferred, but only how much data is transferred. We need this info in order to determine which server gives user best connection speed. We also need this info in order to limit our "Free Trial" subscription which is limited with 1GB of bandwidth usage. Moreover, we do not store logs of your online activity.
DHCP request failed: How to get rid of DHCP Request Failed error when AVG Antivirus is running on your PC
1-month subscription is valid for 30 days from the date you purchased it.
WebRTC is a modern browser-based technology for realtime communication - voice calling, video chats and file sharing directly in a browser.
WebRTC implements STUN (Session Traversal Utilities for Nat), a protocol that allows to discover the public IP address sometimes. To disable it:
Trust.Zone VPN Client is requesting Trust.Zone DNS server in order to receive IP address of the best server for every user. This is a safe operation, but some firewalls, antivirus and anti-malware software may block the requests. The solution is to add Trust.Zone VPN Client into exceptions/exclusions list to your firewall, antivirus and anti-malware software. This way Client DNS queries will not be blocked and error will disappear.
Please read how to add Trust.Zone into exceptions/exclusions list into your firewall, antivirus or anti-malware software in the following FAQ item: Antiviruses and Trust.Zone: How to add Trust.Zone VPN Client for Windows into exceptions/exclusions list in your firewalls, antivirus or anti-malware software?
Your ISP is able to track you in case you've lost a connection to Trust.Zone VPN while loading internet pages or downloading files or in case you did not connect to Trust.Zone VPN by some reason.
Please, make sure you're using internet only when you're connected to Trust.Zone VPN. You can always check if you're connected to Trust.Zone on our Check Page.
Make sure Kill switch is turned on in client settings (in case of using Trust.Zone VPN Client for Windows). Kill switch prevents exposing your IP and data transferred when your VPN connection drops by any reason. Kill switch disables any network connections except connection to Trust.Zone VPN Server.
Please, take into attention, if Kill switch is turned on, your network connections will be disabled when client is running and you'll have no internet access until you connect to any Trust.Zone VPN Server or until you exit client.
Also, make sure you have no DNS leak and/or no WebRTC leak.
Please perform IPv6 leak test to make sure you have no IPv6 leak. In case you have IPv6 leak or if you plan to use client in other networks you need to turn off IPv6 (Internet Protocol Version 6 (TCP/IPv6)). Please open following link to perform IPv6 leak test: http://ipv6leak.com/
Please turn off Internet Protocol Version 6 (TCP/IPv6) for your active network connection (Usually Wi-Fi or Ethernet connection) as follows: run ncpa.cpl, double click your active network connection, click Properties button and turn off Internet Protocol Version 6 (TCP/IPv6) as shown on screenshot below. Then click OK to save changes.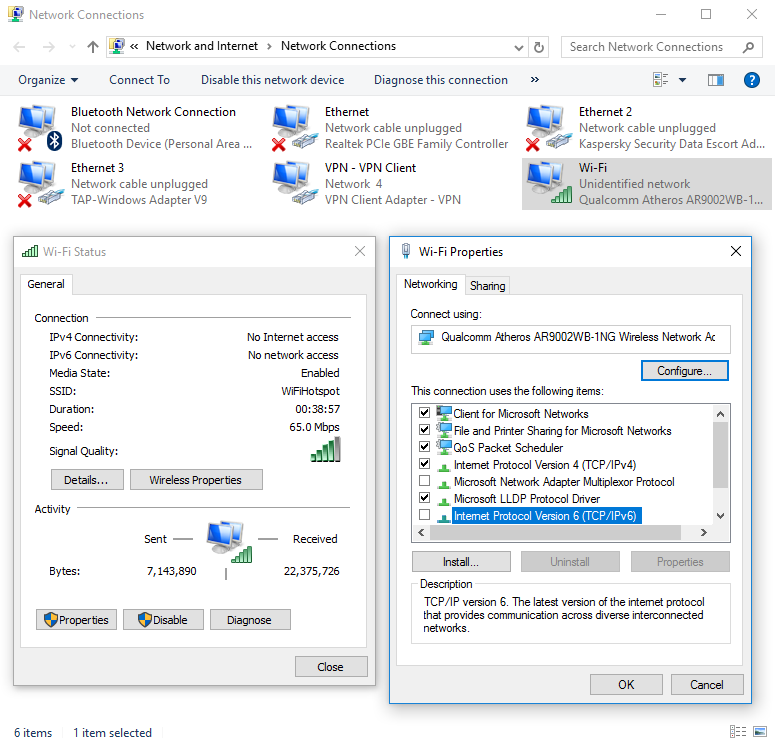
Please turn off all items except Internet Protocol Version 4 (TCP/IPv4) for VPN - VPN Client connection same way as above. Result should look like shown on screenshot below:
Please also turn off Teredo in your Windows. Teredo is transition technology that gives full IPv6 connectivity for IPv6-capable hosts that are on the IPv4 Internet but have no native connection to an IPv6 network.
In order to turn off Teredo please do following:
1) Run Command Prompt as Administrator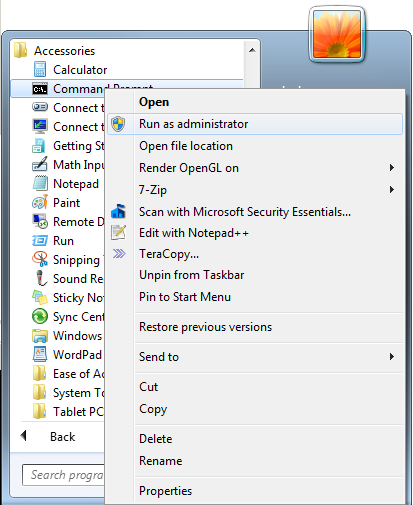
2) In Command Prompt run following command:
netsh interface teredo set state disabled
3) Reboot your PC
PayPro payment processing system may ask customers for more personal details in order to complete payment by Credit Card or PayPal.
PayPro is doing that in order to protect users from unauthorized payments from their Credit Cards or PayPal accounts to prevent possible problems.
For customers who don't want to share the personal details, we recommend using payments with Bitcoin payment method. Bitcoin - is anonymous type of payment. We receive Bitcoin payments directly without third-party payment system.
All Trust.Zone VPN Servers are combined into Geo-Zones (VPN Zones). They was made to provide users with better connection speed and stability, so, user can connect to servers closer to it's locations and if some server becomes unavailable by any reason, user will be reconnected to another server in the same VPN Zone automatically.
In order to switch to another Trust.Zone account in Trust.Zone VPN Client, please follow the steps:
1) Open Trust.Zone VPN Client.
2) Click Settings icon and turn off Kill switch.
3) Click Status icon, hold Ctrl + Shift + Alt on your keyboard and left click Renew button, then confirm logout.
4) Login back with your Email and Password you're using to login to Trust.Zone site.
5) Disconnect and connect again.
This problem appears on OS Windows because OS is unable to check a new driver certificate. We strongly recommend installing a security update for Windows - KB3033929. Windows is unable to check new certificates without update KB3033929. This may cause problems with any new software.
We strongly recommend turning Windows Update on and installing all available Windows updates.
Alternatively you can install update KB3033929 only if you, by some reason, don't want turning Windows Update on.
Please use the following FAQ in order to remove Trust.Zone VPN Client manually: How to remove Trust.Zone VPN Client for Windows manually
1) Download command line script: remove_tz_client.cmd
2) Double click script to run it.
DNS leaks are possible when you have DNS servers of your ISP set in your Internet connection settings or in your modem/router. In order to fix DNS leaks we recommend to switch from DNS servers of your ISP to Trust.Zone DNS or other trusted DNS servers. New DNS servers should be set in your network connections settings as well as in your modem/router. You can use Trust.Zone DNS (the safest), Google Public DNS, OpenDNS or any other DNS servers you trust.
How to set Trust.Zone DNS in your Internet connection?
Use the following Trust.Zone DNS: 109.236.87.2, 23.237.56.98
Tutorial for Windows 10/8/7: http://www.thewindowsclub.com/how-to-change-dns-settings-in-windows-7-vista
How to set Google Public DNS in your Internet connection?
Official tutorial from Google: https://developers.google.com/speed/public-dns/docs/using
Video for Windows 7: https://youtu.be/7DBRynpVT84?t=57s
How to set OpenDNS in your Internet connection?
Official tutorial from OpenDNS: https://use.opendns.com/
What other DNS servers can i use with Trust.Zone VPN?
We've prepared list of DNS servers you can use with Trust.Zone VPN.
Port forwarding works only while you're connected to a dedicated IP with a port forwarding support.
You can purchase a Dedicated IP + Port forwarding feature while purchasing a new subscripiton from the Order Page, or, you can add it for your currently running subscription. Just open the Subscriptions Page and click ADD FEATURES button.
While you're connected to your dedicated IP with port forwarding support, all the ports from the range 11000-65535 will be automatically forwarded to the deice you're connected from.
Yes, you can purchase/extend a subscription while you are still running an active subscription. In this case your newly purchased subscription will get 'pending' status and become active after your current subscription expires, so you will not experience any gap in service.
If your active subscription is a "Free Trial" subscription, it will be terminated immediately and your newly purchased subscription will start after payment is complete.
While connecting to Trust.Zone VPN you can get Authentication failed error. There can be several reasons why you can see this error message:
1. You're using your website login/password in your OpenVPN or L2TP/IPSec connection.
Çözüm: Please use your VPN User / VPN Password instead. You can find your VPN credentials here: Manual Setup Page
2. Your current subscription is a paid subscription and expired.
Çözüm: You need to have a subscription with active status in order to use Trust.Zone. You can check your current subscriptions statuses on your Subscriptions Page. You can purchase a new subscription on the Prices Page
3. Your current subscription is a FREE TRIAL subscription and your data transfer limit exceeded or your FREE TRIAL subscription is expired.
Çözüm: You need to have a subscription with active status in order to use Trust.Zone. You can check your current subscriptions statuses on your Subscriptions Page. You can purchase a new subscription on the Prices Page
Some email providers (such as GMail, Outlook, etc) may block access to their services when customer's IP address changes to IP address of another country too quickly. For example, when you usually access your email from UK and suddenly you are trying to access it from US (while being connected to US VPN server) your email provider 'thinks' that somebody from US is trying to hack your email and blocks access to your email box.
To unlock access to your email while using VPN server from a different country you need to open your email inbox in web browser and pass verification. After verification you should be able to send/receive emails with your email client.
If you're using Gmail you may need to open following page https://accounts.google.com/DisplayUnlockCaptcha and click "Continue" while being connected to Trust.Zone VPN to restore access to your Gmail mailbox.
Yet, in some cases, this wouldn't help because some VPN servers have blocked outgoing email ports due to SPAM complaints from server providers. In this case you can still send E-Mail messages from your webmail (when you access your E-Mail account from browser).
No need. Just restart the application. Click on "Exit" icon, close the application and then run it again!
In case you've put wrong email address during registration or payment and haven't confirmed it yet, you can change it on your Profile Page.
Just open your Profile Page, replace your wrong email address with correct one, enter your current password to "Current Password" field and click "SAVE GENERAL SETTINGS" button.
Shortly confirmation message will be sent to your new email inbox. Please open it and click confirmation link to confirm your new email address.
Please note: You will unable to change your new email address after you've confirmed it.
When you connect to a new server in the same VPN zone (for example, us.trust.zone) Windows creates a new network between you and that server. One network per each server in VPN zone.
After you have connected to every server in the zone at least once, windows stops creating new networks.
This happens due to obsolete GEO IP database on some websites. You can check your current location on Connection Check Page.
Yes, Trust.Zone VPN can be used on router in case your router supports OpenVPN or L2TP/IPSec VPN Client feature. Please refer to manual reference for your router.
During setup of VPN connection you may be asked for CA certificate, client certificate, key file, ovpn file, your VPN credentials etc. You can find all this on Manual Setup Page.
Some routers may be flashed with DD-WRT firmware. You can check if your router is supported by DD-WRT project as well as download DD-WRT firmware and find flashing instructions here: DD-WRT Router Database.
Trust.Zone VPN supports full version of DD-WRT firmware. You can find instructions how to setup OpenVPN connection with DD-WRT on DD-WRT Instructions Page (please select VPN zone closest to your location and follow instructions steps).
Sometimes, after you switch from one network to another, Trust.Zone VPN Client for Windows may have problem with passing "Initialization" stage.
The following steps may fix your problem:
1) Exit Trust.Zone VPN Client (in client click Exit then OK to confirm)
2) Run services.msc (press Win-r, type services.msc and press Enter), find service Trust.Zone VPN Client and stop it.
3) Run Notepad as administrator (right click on Notepad shortcut then click Run as administrator), click File->Open and open file C:\Program Files\Trust.Zone VPN Client\vpn_client.config
4) In vpn_client.config file edit line beginning with bool NSlookup so it will look like NSlookup true
5) In vpn_client.config remove line beginning with string NS
6) Save changes in file and exit Notepad
7) Start service Trust.Zone VPN Client
8) Run Trust.Zone VPN Client and try to connect to the VPN
1) Go to Settings from Start menu (click gear icon or type Settings from Start menu and click it)
2) Go to Network & Internet
3) Go to Ethernet from right sidebar
4) Select network with name beginning with Network and number following after it
5) Turn on Make this PC discoverable switch
In case you unable to connect to Trust.Zone VPN from China please try using OpenVPN connection with UDP protocol.
Please open following link, choose your operating system, choose OpenVPN protocol then desired VPN location: https://trust.zone/tr/setup/
You can choose UDP protocol from instructions page before to download .ovpn file.
Trust.Zone VPN does NOT support IPv6.
We strongly recommend to turn IPv6 off before to use Trust.Zone.
Trust.Zone VPN by-default uses the following encryption algorithms:
OpenVPN Connection:
L2TP/IPSec Connection:
Trust.Zone VPN client for Windows:
Hash Algorithm: SHA-1, Cipher Algorithm: AES-CBC, Cipher Key Size: 256 bits
1. Run the Tunnelblick app, click a small Tunnelblick icon at the right on the top menu bar and click the VPN Details... menu item to open Tunnelblick window.
2. Click the Utilities button then click the Uninstall Tunnelblick... button to start the uninstalling process. Click the OK button in the next dialogue.
In case you have no Uninstall Tunnelblick... button or button is greyed out please download the Uninstaller app suitable for your Tunnelblick version from http://tunnelblick.net/downloads.html and use it to Uninstall Tunnelblick.
3. Reboot your Mac
4. Download and install the latest stable Tunnelblick suitable for your Mac OS X version from http://tunnelblick.net/downloads.html
5. Make sure you're logged into your Trust.Zone account and download a Configurations.tblk
6. Drag-n-drop the downloaded Configurations.tblk file to the small Tunnelblick icon at the top of the screen. This will add all Trust.Zone VPN locations to the Tunnelblick.
7. Select the desired VPN location from Tunnelblick and click it to connect or follow the manual How to connect with Tunnelblick to specific VPN server location on Mac OS X
First you need to remove old VPN configurations from the Tunnelblick app.
You can do that using the Finder app.
1) Quit the Tunnelblick app by pressing Command-Q while the Tunnelblick window is in focus.
2) Run the Finder app.
3) Press Command-Shift-G keystroke to open Go to the folder dialogue.
4) Copy the following path and paste it the mentioned dialogue: /Library/Application Support/Tunnelblick/Users/ and press enter.
5) Then go to the folder which name is the same as your Mac OS user name. You will see the connection folders (connections categories) there. Select all folders and delete them.
6) Using the Command-Shift-G keystroke please go to the following directory: ~/Library/Application Support/Tunnelblick/Configurations/ and delete all folders from it.
Steps above will delete all VPN connections from the Tunnelblick.
Now you can download and import new configurations into the Tunnelblick:
1) Download the Trust.Zone-VPN-Configs.tblk file from the following page: https://trust.zone/tr/setup#manual_setup (make sure you're logged into your Trust.Zone account)
2) Run the Tunnelblick app and click I have configuration files in the Welcome to Tunnelblick dialogue. Then click OK in the Add a configuration dialogue.
3) Navigate to the downloaded Trust.Zone-VPN-Configs.tblk file then drag-n-drop it to the small Tunnelblick icon at the right in the top menu.
4) Provide your Mac OS User name and Password when prompted.
You can change DPI settings for Trust.Zone app.
Instructions:
1) Run Trust.Zone VPN Client
2) Right click Trust.Zone icon on the taskbar. Menu with the following items will appear: TrustZone VPN, Unpin from taskbar, Close window.
3) Right click on the TrustZone VPN menu item then left click on Properties.
4) Switch to the Compatibility tab.
5) Click Change settings for all users then click on Change high DPI settings.
6) Turn on checkbox Override high DPI scaling behavior. Scaling performed by: and select System from drop-down menu.
7) Click OK then OK again to close properties windows.
8) In case client still looks the same after steps above, please try to repeat the instructions but this time please select Application instead of System on the Step 6.
