Did you know that you can easily enable Kill Switch option for your Mac OS device?
Tunnelblick, a VPN client for MacOS, has a "Kill Switch" that can disable all network access if the VPN disconnects by some reason. It can be helpful when running an application (for example, a BitTorrent client) that you do not want to "leak" data outside Trust.Zone VPN.
Kill Switch blocks all outgoing and incoming traffic if internet connection drops for any reason, so your IP address will never be revealed if VPN connection drops by unexpected reason.
To enable VPN Kill Switch for Tunnelblick on MacOS - go to the "Settings" tab of the "Configurations" panel of Tunnelblick's "VPN Details" window. Just set "On unexpected disconnect" option to "Disable network access" (kill switch active).
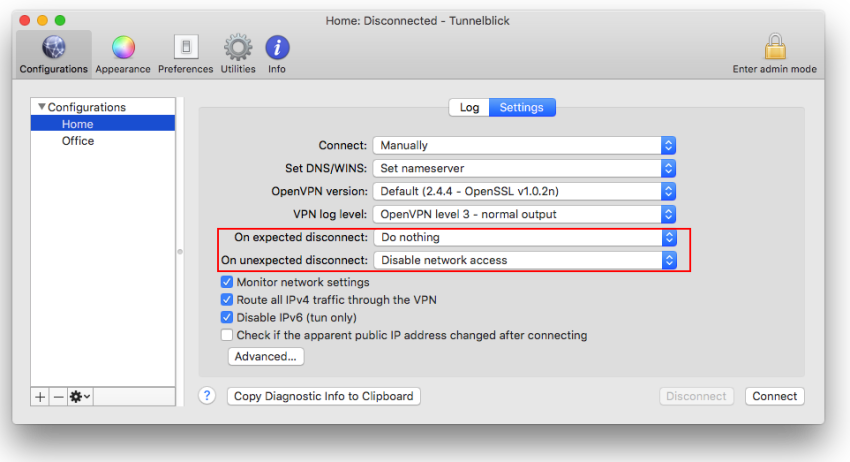
In the above screenshot, "On expected disconnect" is set to "Do nothing" (kill switch inactive) and "On unexpected disconnect" is set to "Disable network access" (kill switch active). If there is an expected disconnection, nothing special will be done. If an unexpected disconnection occurs, however, all network access will be disabled.
When the kill switch has been activated:
If network access has been disabled when you quit or launch Tunnelblick or try to connect a VPN, Tunnelblick will ask if you want to re-enable it.
If network access has been disabled and you cannot run Tunnelblick, network access can be restored manually:
Launch System Preferences, and click on "Network". For each network service that is labeled "Inactive"
If you wish, turn Wi-Fi on. You can use the Wi-Fi icon in the menu bar, or, in the "Network" System Preferences, select the Wi-Fi service in the list on the left and then click the "Turn Wi-Fi On" button.
